KeepNote Documentation
Overview
- Philosophy of KeepNote
- Getting started
- Basic use
- Editing your notes
- Backup and export
- Customization
- Miscellaneous
- Developer notes
KeepNote Philosophy
KeepNote is designed to be a general note-taking program that can be used in many different ways depending on the user's needs. I believe note-taking programs have not quite yet settled on the perfect format and interface for note-taking. In comparison, there are well understood standards (expectations) for web browsers, word processors, text editors, etc. In my view, note-taking is still searching for its standard and expectation. Perhaps there are several note-taking strategies, that each need their own program. My goal with KeepNote is to satisfy a particular note-taking style that I find myself using for my research. Hopefully, others will find it useful as well.
I like to think of my notes as emails to myself. You can see that KeepNote uses an interface very similar to desktop email programs. I think this interface allows one to organize a huge number of notes in a very simple and well understood way.

Why not a wiki or some other program?
Obviously, there are many ways to take notes. You might need a "sticky notes" kind of program or a wiki-style program. If so, there are many good programs that achieve those styles very well. However, KeepNote is different, and is designed to fit the style I find myself using. I suspect that this style is one that many other people will find natural. I envision KeepNote being used in a research setting where you have notes that follow both journal (time-sensitive, linear organization, pictured on the left) and reference (time-insensitive, hierarchical, pictured on the right) styles.


For very large notebooks, a treeview (the left side of the window) becomes overwhelming, a problem I have run into with many other programs. In these situations, a listview (top portion of the window), becomes important. It allows browsing large sub-folders, while keeping them collapsed in the treeview. The listview also allows sorting by both creation time, note title, and manual sorting.
Another feature that I have focused on is image manipulation. In my notebook, I store plots that I make for my research and beside them I write rough draft figure legends to record my conclusions. My notebook is littered with hundreds of plots that record the intermediate steps between my first ideas and the final results that occur during a project's lifetime. My favorite feature is to use search to find an old plot that I made that I didn't understand at the time, but that I can now interpret.
I have several ideas about where I want to take KeepNote in future development. If you have any ideas that you would like to see implemented, please share them with me at rasmus[a t]mit[d o t]edu.
Long term note taking strategy
Notes are most valuable when you can easily access them. That means accessing your notes on multiple platforms (KeepNote supports Windows, Mac OS X, and Linux) and accessing them years from now. All notes are stored in UTF-8 HTML files and nested in ordinary folders on the file system. That means you can read your notes with nothing more than a web browser. I designed KeepNote this way to address my own concerns with saving my notes in a proprietary format that may lock me into a particular program or web service.
Getting started
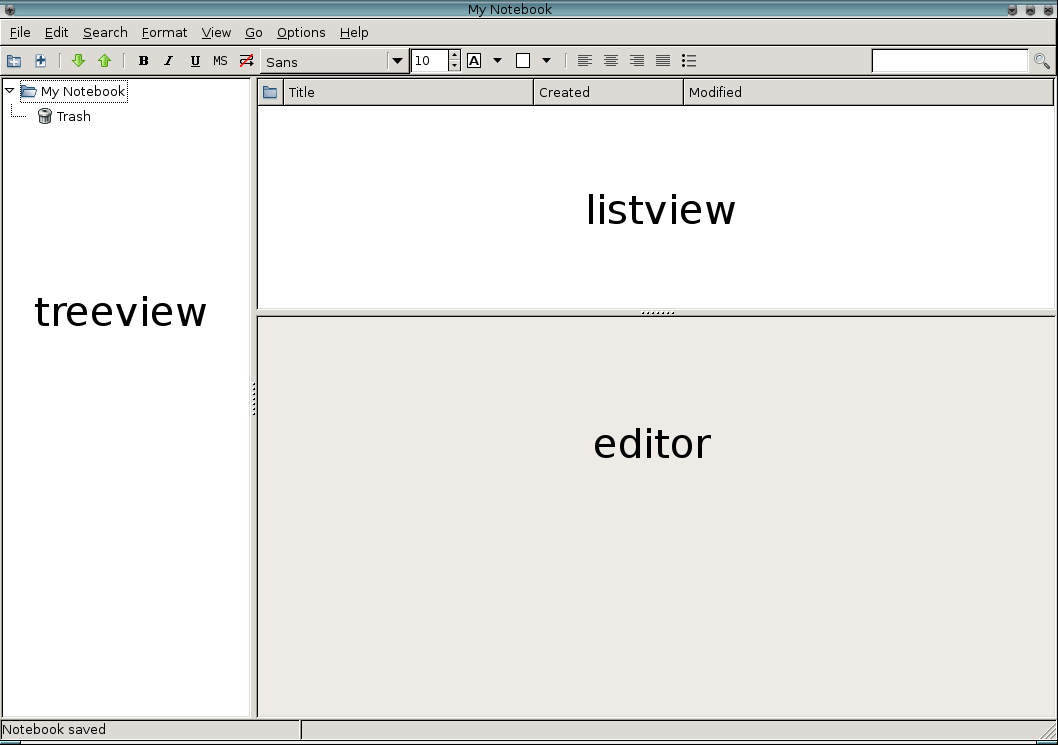
When you run KeepNote for the first time it should look something like this.

To create a new notebook, choose the menu option: .

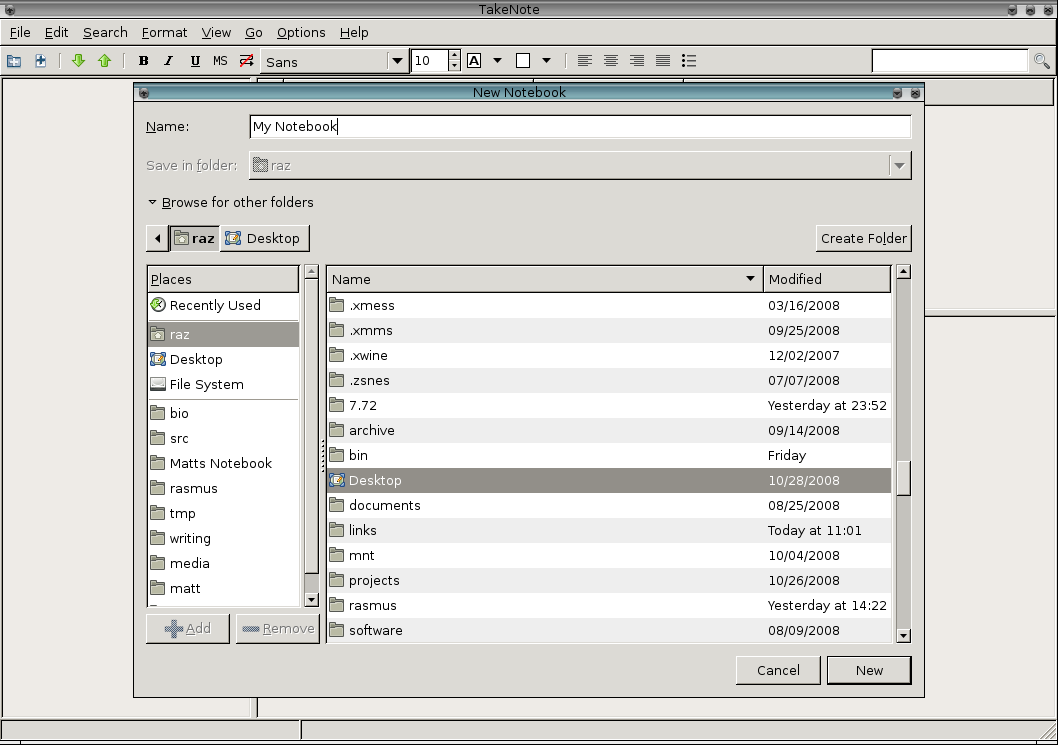
A "New Notebook" dialog box will appear. Type a name for your new notebook and choose a location on your hard drive to save it. Lastly, click the New button. Your new notebook should look something like the screenshot below. To the left is a hierarchy (a very small one at first) called the treeview. When you select a folder in the treeview, the notes within it will display in the listview, located in the top panel of the window.
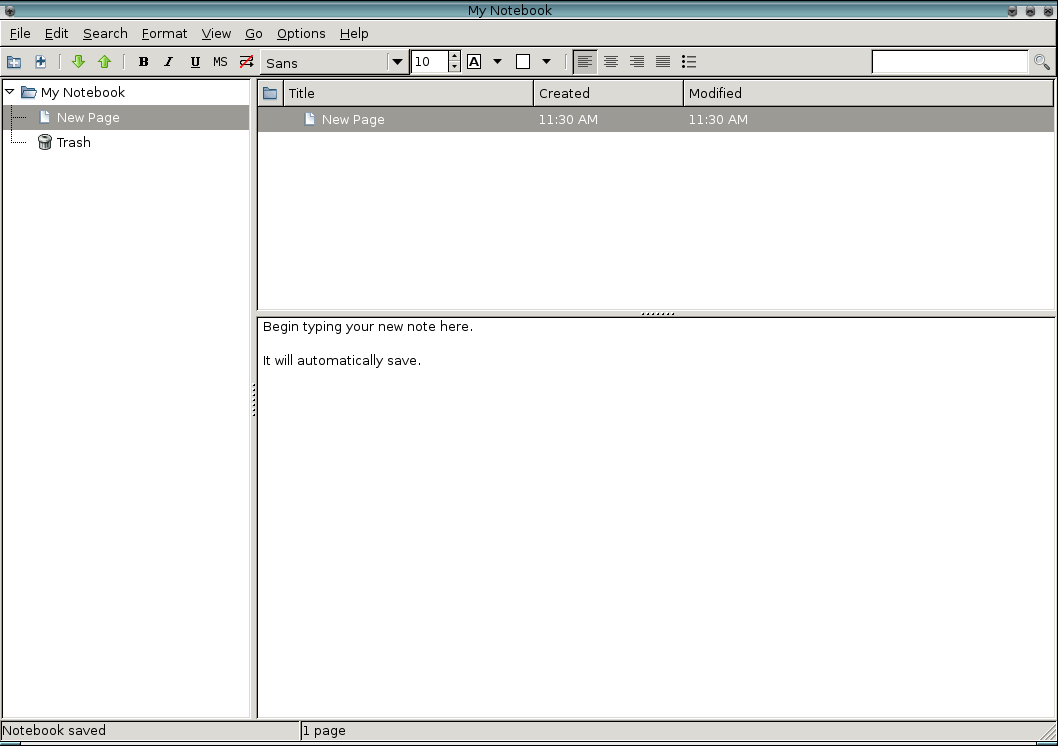
To create your first note, go to the menu option: . A new page called "New Page" will be added to the treeview and selected. The editor will become active (i.e. white) indicating that you can click your cursor on it and begin typing your new note.
The most convenient way to create new pages and folders is to use either the new page and folder icons in the toolbar (pictured below) or to use the shortcut keys Ctrl+N (New Page) and Ctrl+Shift+M (New Folder).
Once you have several notes made, you can use drag and drop in either the treeview or listview to rearrange your notes.
Basic use
KeepNote has several subtle features which are very convenient, especially for large notebooks.
Treeview and listview
Saving collapse/expand. First, KeepNote saves the expand/collapse state of every folder in the treeview (left panel in screenshot below). This allows you to visually organize your notes. Often you will have some folders with only a handful of notes which you will want to keep expanded (visible) at all times. However, you will find that some folders will accumulate many notes (e.g. a folder that acts like a journal of notes created each day). These folders are too large to display easily in the treeview. Instead it is simpler to keep them collapsed, and to use the listview (top right panel in screenshot) to view the contents of the folder.
Nesting in listview. Another subtle feature is that the listview can display nested folders and notes as well. The collapse state of folders in the listview is saved separately.
Sorting. In the listview, you can sort notes by many criteria (e.g. title, creation time, modification time, etc) by clicking on the column headers. If none of the columns are activated for sorting, the listview goes into "manual" sort mode, which displays the notes as they appear in the treeview and allows you to drag and drop notes into any order you wish. One very subtle but convenient feature is that the listview sorting is saved on a per folder basis. I use this feature to save journal-like folders by creation date and reference-like folders by note title.
Notebook Tabs
KeepNote supports multiple tabs, which allow you to simulataneously view different parts of a large notebook. If you have several notes that you refer to very often, you can dedicate a tab to them.
Tab names
Tabs typically take on the name of the currently viewed note. However, you can also give a permanent name for a tab. Simply double click any tab and a name editor will appear. Type your new name and press enter to set the name.
Editing your notes
Links
Hyperlinks are created with the link toolbar button
 or with the keyboard shortcut Ctrl+L. The
selected text will become a link. Whenever the cursor is inside a
link, the Link Editor will appear at the bottom of the text
editor.
or with the keyboard shortcut Ctrl+L. The
selected text will become a link. Whenever the cursor is inside a
link, the Link Editor will appear at the bottom of the text
editor.
The Link Editor will show the current URL of the link under your cursor. You can change the URL of a link by simply editing the URL shown in the link editor. Pressing Enter will accept the change, while Esc will discard. To quickly begin editing a URL, you can position your cursor on a link and use Ctrl+L to move the cursor from the text editor to the Link Editor. In this way, you can add links and change their URLs, while only using the keyboard, if you wish.
To visit a link, either double-click a link or use Ctrl-Spacebar while your cursor is over the link.
Note-to-note links
KeepNote also supports links between notes in a notebook. Simply start a link with Ctrl+L or clicking the link button and start typing the name of a note. An auto-complete drop down list will appear allowing you to pick the note you wish to link to. An auto-complete list also appears when typing in the link editor on the bottom of the editor.

Another way to create a link is to use copy-and-paste. First, select a note in the treeview or listview that you wish to link to and copy it (Ctrl+C or the menu ). Next, navigate to the note in which you wish to make the link, and paste into the text editor to create a link.
Note: note-to-note links will never break (unless you delete the target note). Feel free to rename a note or move it around. Links will still point to the right notes.
Images
KeepNote allows inline images in notes. There are several options for images in their right click menu (see left screenshot below).
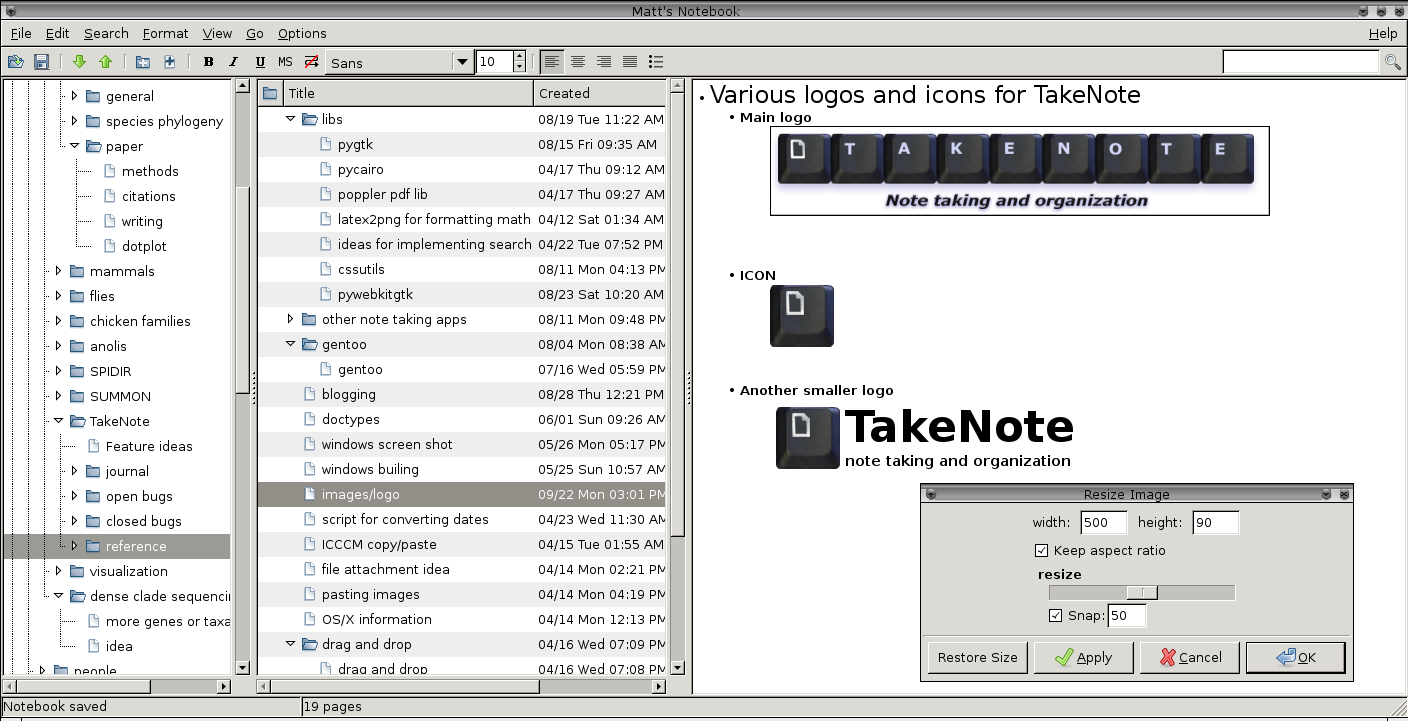
One convenient feature for images is the Resize Image... option. When this is chosen, the Resize Image window will appear (see right screenshot above) allowing you to specify a new width and height for the image. When a new size is chosen, KeepNote will display the image at its new size, while keeping the original image file unaltered (original size). Double clicking the image or choosing the View Image menu option will display the image at its original size in the image viewer of your choice. This feature is convenient for shrinking large images into thumbnails within your notebook.
File attachments
KeepNote can store any file as an "attachment" to the notebook. To attach a file, use the menu option . On Linux, you can attach a file by dragging-and-dropping a file from the desktop onto the treeview or listview. To open an attached file, simply double click its icon in the treeview/listview or use . See the File Launcher option in Helper applications for how to properly configure viewing of file attachments.
Spell checking
Spell checking is available only on Linux and Mac OS X at this time. GtkSpell is required for this feature to be enabled. You can install the required dependencies on Debian (or a compatiable platform) using the following command:
apt-get install python-gnome2-extras aspell aspell-en aspell-XX
Where XX is your own specific language (e.g. de for German spell checking). Once dependencies are installed, you can use the menu option to toggle automatic spell checking on and off.
Backup and export
Backup and restore
It's very important to backup your notes. Since KeepNote simply saves your notes as directories and files, many backup programs (especially incremental ones) can backup KeepNote very easily. KeepNote also offers a built-in backup option. Under menu option , you can specify a backup/archive filename, and a copy of your notebook will be stored in a *.tar.gz (gzipped tar file). This backup file is nothing more than a zip file of the notebook. To restore an old version of a notebook from a backup file, use menu option . You will need to give the filename of the backup file and the new name and location of where to extract the old notebook. I recommend periodically backup your notebooks to prevent data loss.
Import/Export
KeepNote allows you to export your notebook in different file formats. Currently, the only format implemented is HTML (use ). The hierarchy (as seen in the treeview) will be exported and all note-to-note links will be translated from KeepNote's format (e.g. nbk:///nodeid...) into relative file links that will work in all web browsers. More export options (as well as importing options) will be added in future versions of KeepNote.
Customization
Notebooks
Default notebook. In the KeepNote Preferences dialog (accessible by ), you can specify a default notebook to open immediately every time KeepNote opens. This is often very convenient for frequently opened notebooks.
Autosave. Notebooks are automatically saved every 10 seconds. This interval can be changed or disabled in the menu.
Custom note icons
In KeepNote, you can customize the icons that appear next to your notes. To change a note's icon, right-click on the note and locate the menu. You will then see a list of icons to choose from (see left screenshot below). This is called the quick-pick menu.
If you do not see an icon that you want, you can use any picture of your choice as an icon. To do so, choose the menu. You will then see the New Icon Dialog Window (shown in right screenshot above). Each note can have up to two icons associated with it: a normal icon and an optional open version of the icon. If the open version of an icon is set it will be used when the note is expanded in the treeview or listview (note: folders typically have an open version of its icon). You can select an icon from the icons listed below and click either the Set icon or Set open icon buttons to set the note's icon. To load a new icon, choose either of the Browse... buttons to load an image of your choice.
A note on "open" icons
KeepNote can guess the "open" version of an icon from an icon's filename. If an icon is called "folder-green.png" then KeepNote will try to automatically find an open version named "folder-green-open.png" (i.e. a filename with "-open" appended). If such a file exists, then it will be used. For example, in the New Icon screenshot above, the icon "folder-green.png" has been chosen and the open version of the icon (displayed in the preview beside the Browse buttons) is automatically found. You can override this feature by explicitly setting the open version of an icon.
Managing icons
After you select a new icon, it will be added to the Notebook-specific Icons list for future reuse. A copy of the icon image is now stored in your notebook. If you would like to remove a custom icon from your notebook, simply select it in the list below. And click the Delete icon button. Lastly, you can change which icons appear in the quick-pick menu by selecting an icon in your notebook-specific list and clicking the green arrow. Icons in the quick-pick menu can be reordered using drag and drop.
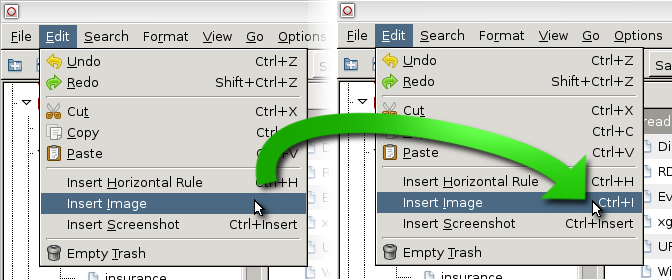
Custom keyboard shortcuts.
You can add/change a keyboard shortcut to any menu option in KeepNote. Simply place your mouse cursor over the menu item which you would like to customize and press your desired shortcut combination (e.g. Ctrl+I). The new shortcut should then appear next to the menu item.
To remove a shortcut altogether, press Ctrl+Backspace. All shortcuts are saved in a file within KeepNote's preference directory (~/.config/keepnote/accel.txt on Linux and C:\Documents and Settings\USER_NAME\Application Data\keepnote\accel.txt on Windows). You can also change shortcuts by editing these files in a text editor of your choice while KeepNote is not running.
Note: on Linux, in order to use customized key shortcuts, the GTK configuration file ~/.gtkrc-2.0 should contain the following line:
gtk-can-change-accels = 1
If you use the GNOME Desktop, then activate custom keyboard short-cut by going to , and select the "editable menu shortcut keys" option. On Ubuntu, you may need to run gconf-editor and change the option in /desktop/gnome/interface/can_change_accels to true(checked). Read more here and here.
Helper applications
Helper applications are other programs installed on your computer that KeepNote can use to perform certain operations, such as image editing, web browsing, text editing, etc. These applications are chosen from the KeepNote Preference dialog, which is found in the menu: .
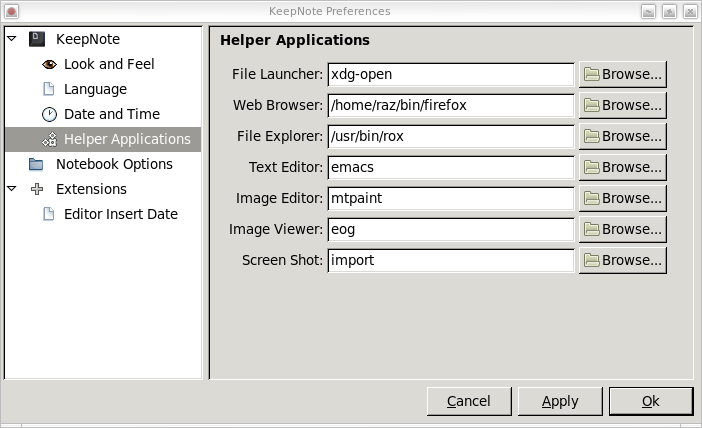
Web Browser
KeepNote saves notes as HTML files. These notes can be displayed in your web browser using the menu option . The web browser used for displaying notes is specified in the Helper Applications options. For Linux, I recommend Firefox, and for Windows either Firefox or Internet Explorer should work well.
File Explorer
KeepNote saves the hierarchy seen in the treeview as a hierarchy of directories on your hard drive. For convenience, KeepNote lets you view these directories directly in case you want to get direct access to certain images or HTML files. This is done by using the menu option . The application used for displaying the directories can be specified in Helper Applications options. For Linux, you can use applications such as nautilus, konquer, or my favorite rox. For Windows, the default is explorer.exe.
Text Editor
KeepNote offers a convenient debugging tool for when notes are not saving properly. You can open any note as a raw text file in the text editor of your choice. This is specified with the Text Editor helper application. For Linux, you can use programs like emacs, vi, gedit, etc. For Windows, I recommend WordPad, but not notepad. Notepad does not read Unix '\n' newlines correctly (which KeepNote uses), but WordPad will read such files just fine.
Image Editor
KeepNote allows inline images in notes. You can edit any of these images with the image editor application of your choice. For Linux, I recommend the mtpaint program. Its quick loading and has decent features. Of course gimp is also very good (slower loading though). For windows, I use trusty mspaint, but any image editor should do.
Image Viewer
KeepNote displays images inline, but sometimes you want to view images in a separate image viewer (to use features like zoom, etc). The image viewer is executed whenever you double-click on an image or use the "View Image.." menu option. For Linux, I recommend Image Magic's display program. For Windows, Internet Explorer is a decent program for viewing images.
File Launcher
KeepNote can store any file as an "attachment" to the notebook. To open an attached file, simply double click its icon in the treeview/listview or use . The filename will be passed to the File Launcher program which should then find the appropriate program for viewing the attachment (i.e. use Excel to view an Excel spreedsheet). For Windows, I recommend explorer.exe and for Linux I recommend a program like xdg-open or the file explorer for your desktop environment.
Screenshot
Screenshots can be taken very easily in KeepNote using Ctrl+Insert. KeepNote uses helper applications to actually take the screenshot. For Linux, I recommend ImageMagic's import. For Windows, I recommend you keep the field for screen shot blank. This will tell KeepNote to use the built in screenshot feature.
Additional notes: To be specific, KeepNote expects the screenshot program to take a single command-line option: the output image filename. This filename is a tempfile managed by KeepNote. Upon activation of the screenshot feature, KeepNote will minimize (to get out of the way) and the screenshot program will be executed. The screenshot program is expected to allow the user to take a screenshot and then save the image to the given output file. After the screenshot program finishes, KeepNote will un-minimize, attempt to read the saved screenshot, and insert the image into the currently open note. The tempfile will also be removed.
Extensions
KeepNote uses extensions (i.e. plugins) to supply extra features to the program. You can view the extensions currently installed in KeepNote by using menu option :
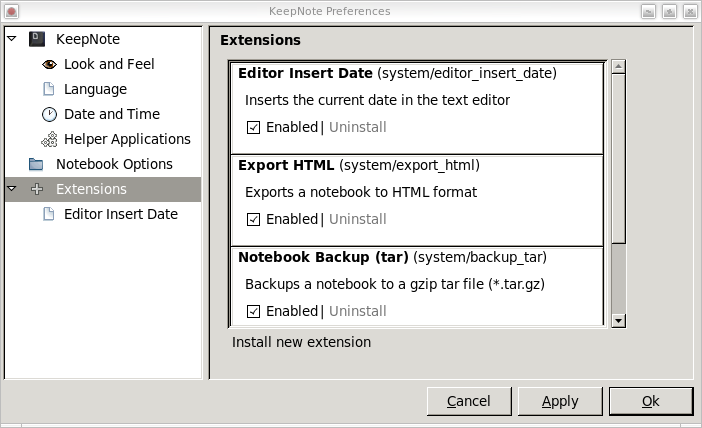
KeepNote comes with several built-in extensions called system extensions. They are installed in the same folder at the KeepNote application. KeepNote also supports user extensions which are installed with the rest of the user's preference information.
New extensions can be installed by downloading KeepNote Extension Files (*.kne). You can either open these files with KeepNote or use the Install new extension button as shown in the above screenshot.
If you are interested in developing your own extensions see the developer notes.
Command-line control
KeepNote can be controlled from the command-line. By running KeepNote from the command-line with the --help argument:
keepnote --help
KeepNote will list help information about its command-line options. You should see something similar to this:
Usage: keepnote [options] [NOTEBOOK]

Options:
  -h, --help            show this help message and exit
  -c, --cmd             treat remaining arguments as a command
  -l, --list-cmd        list available commands
  -i, --info            show runtime information
  --no-gui              run in non-gui mode
  --show-errors         show errors on console
  --no-show-errors      do not show errors on console
  --no-default          do not open default notebook
  --newproc             start KeepNote in a new process
  -p PORT, --port=PORT  use a specified port for listening to commands
Custom commands
Once KeepNote is running, you can send commands to it (i.e. inter-process communication) by using the --cmd option. To get a list of available commands run the following:
keepnote --list-cmd
and you should see something similar to this:
available commands:
 ext_path  PATH  -- add an extension path for this session
 focus  -- focus all open windows
 install  FILENAME  -- install a new extension
 minimize  -- minimize all windows
 new  PARENT_URL  -- add a new note
 quit  -- close all KeepNote windows
 screenshot  -- insert a new screenshot
 search-titles  TEXT  -- search notes by title
 tmp_ext  FILENAME  -- add an extension just for this session
 toggle_windows  -- toggle all windows
 uninstall  EXTENSION_NAME  -- uninstall an extension
 view  NOTE_URL  -- view a note
This list of commands may vary depending on your version of KeepNote or which extensions you have installed.
The focus command
Let's look at the focus command. First, start KeepNote. Then open your command-line terminal and run the following:
keepnote --cmd focus
This should raise the KeepNote window from the background to the foreground allowing you to quickly add a new note. This can be very convenient when combined with a desktop shortcut. Each OS and Desktop environment configure shortcuts differently, but on Windows one could do the following:
- Create a shortcut for KeepNote on the desktop.
- Right-click the shortcut and choose Properties.
- In the Target: field add the text --cmd focus at the end of the keepnote.exe path. Make sure the command is outside of the quotes as seen in the screenshot below.
- Click in the Shortcut key: field and type a shortcut to use, such as the function key F8.
- Click OK.
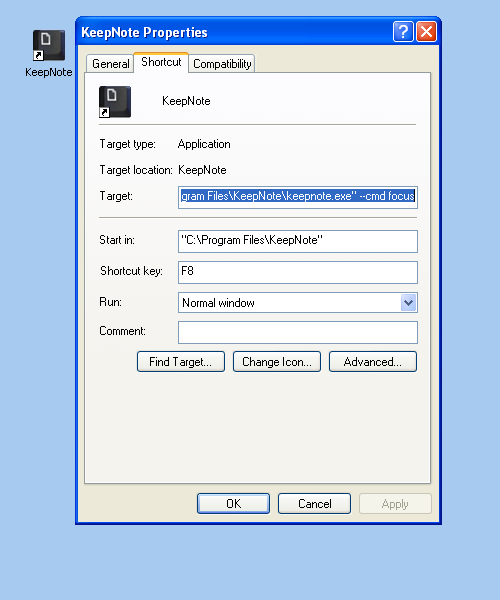
Now whenever you press F8, no matter what program you are currently using, the KeepNote window will gain focus, allowing you to quickly enter a new note!
The view command
Let's say you not only want to focus the KeepNote window but you also want to view a particular note or folder. This can be done with the view command:
keepnote --cmd view "research notes"
This will focus the KeepNote window and display the note with the title "research notes". If there are more than one note with the same title, KeepNote will perform a search, listing all notes with a matching title.
In order to unambiguously specify a particular note, a node URL can be used. These often look something like nbk:///3f7e3c08-a471-4ffa-9f28-0be867656a60. The command search-titles can be used to determine node URLs.
Single-instance
When KeepNote is run, it by default starts a local-only socket at a random port and listens for commands (such as --cmd focus). This allows other instances of KeepNote to contact or detect the main KeepNote process. This is similar to how FireFox and other applications ensure a single instance (i.e. process). If you would like to disable this feature run KeepNote with the --newproc option.
Miscellaneous
Portability
Some people use the term portable to mean that a program can be installed on a removable drive (e.g. USB drive) and that all data is also stored on the drive. This allows someone to move the program and their data to any computer (e.g. between a work and home computer). KeepNote can be used in a portable mode by following these steps:
- When installing KeepNote choose the USB drive as the install location. For example, if the drive is called J:, choose a location like J:\KeepNote
- Create an empty text file at the location J:\KeepNote\portable.txt
- Lastly, make sure to save all your notebooks to the USB drive. For example, your notebook might be saved at J:\MyNotebook1 and another notebook might be saved at J:\MyOtherNotebook2, etc.
Step 2 is needed to ensure that preference data is stored on USB drive. For this example, it will be saved at J:\KeepNote\keepnote. Without this step, user preference information will be saved in the Application Data folder.
Error log
KeepNote maintains a file, the "error log", that contains the history of all errors and warnings that have ever occurred. This file is very useful to look at when debugging a problem. You should also send a copy or portion of the file when reporting problems with the software. See Reporting bugs.
The error log file can be viewed using .
On Windows, the error log is stored in C:\Documents and Settings\USER_NAME\Application Data\KeepNote\error-log.txt.
On Linux and Mac OS X, the error log is stored in ~/.config/keepnote/error-log.txt.
Notebook index
KeepNote maintains an index of each notebook to facilitate faster navigation and linking. This index is stored as a SQLite database and its file is located at your_notebook/__NOTEBOOK__/index.sqlite.
You will probably never need to worry about the index, except for a few special cases. All notes are automatically indexed as they are created and modified. However, if you happen to create/modify notes outside of KeepNote (which is not guaranteed to be supported in all cases), you should let the index know about these changes by choosing the menu .
If you use backup software or a network filesystem with your notebook, you may experience performance issues with the index (I use OpenAFS and have no performance issues). The index file may become large and experience frequent changes. If this becomes an issue, you can specify an alternative location for the index file (say a location on a local disk). To specify an alternative location, use the option .
Notebook version upgrade
Most notebooks created with KeepNote will work with all versions of KeepNote. However, from time to time, I may need to change the file format of notebooks in order to accommodate new features. The following versions of KeepNote use the following notebook versions:
| Program version | notebook version | index version |
| takenote 0.4 - 0.4.5 | 1 | - |
| keepnote 0.5 - 0.5.1 | 2 | - |
| keepnote 0.5.2 - 0.6.4 | 3 | 1 |
| keepnote 0.6.5 - 0.6.8 | 4 | 1 |
| keepnote 0.7 - 0.7.4 | 5 | 3 |
| keepnote 0.7.5 - present | 6 | 3 |
When opening an older notebook in a newer version of KeepNote, KeepNote may ask to automatically upgrade the notebook:
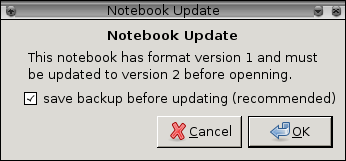
KeepNote will also offer to backup your notebook before the upgrade. This will be useful if you want to go back to older versions of KeepNote.